 By Graham Fisher
Updated November 2026
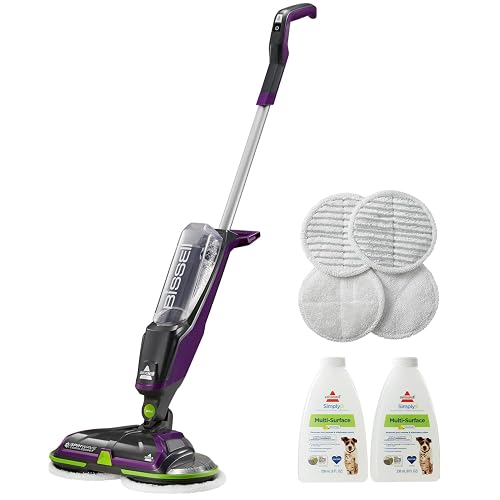
The Bissell Spinwave cordless pet spin mop is a battery-powered mop head that spins its pads to scrub and dry hard floors, with a design aimed at pet owners who deal with hair, paw prints and the occasional accident. This guide walks you through unboxing and charging, choosing the right pad and water setup, a repeatable cleaning routine, and the maintenance steps that keep the mop working well. By the end, you will know how to get a streak-free finish on hardwood, laminate, vinyl and tile while keeping pet hair under control.
If you are still deciding whether a spin mop fits your home, our overview of Mop Types Compared: Spray, Spin, Flat and Steam explains the trade-offs. For a broader look at this model’s features, see Bissell Spinwave Cordless Hard Floor Spin Mop: A Practical Guide (2026).
Shopping for one? See our guide: 6 Best Replace Spin Mop Heads for Easy Floor Cleaning (2026).
What the Spinwave Cordless Pet Mop Is Designed to Do
The Spinwave uses a motorized spinning pad head powered by a rechargeable battery, so you are not pushing a flat mop back and forth by hand. Manufacturers describe the spinning action as a way to scrub with less effort and to lift dried-on residue from floor surfaces. The “pet” version is generally marketed with pad and tool accessories suited to pet hair and daily paw traffic, though the cleaning fundamentals stay the same as any spin mop.
Keep your expectations realistic. A spin mop is a hard-floor tool. It is not meant for carpet, area rugs with heavy fringe or sealed-off wood that has been damaged by standing water. Owners often report the best results when they use it for quick daily or every-other-day maintenance and save deeper cleaning for another day.
Step 1: Unbox, Charge and Check the Parts
Before you clean anything, confirm the battery is fully charged and the parts are seated correctly. Manufacturers typically specify a full charging cycle before first use, so plan for that time before your first session.
- Remove all packaging and set aside the charger, the mop head, the handle or pole, and the pad accessories.
- Charge the battery using the supplied charger until the indicator shows full. Avoid charging in very hot or cold spaces.
- Attach the handle to the mop head, pressing until it locks. Give it a gentle tug to confirm it will not separate.
- Check that the pad attaches snugly. A loose pad wobbles and leaves streaks or missed spots.
- Wipe the battery contacts with a dry cloth if they look dusty, then reseat the battery until it clicks.
Step 2: Choose the Right Pad and Cleaning Solution
Pad choice has a bigger effect on results than most people expect. Use a pad made for the job and match it to your floor type and the amount of mess you are dealing with.
| Floor type | Pad approach | Solution approach |
|---|---|---|
| Sealed hardwood | Soft microfiber or the manufacturer’s wood-safe pad | Dampen lightly; use a floor cleaner made for sealed wood |
| Laminate | Microfiber pad, kept barely damp | Pet-safe laminate cleaner, diluted as directed |
| Vinyl and luxury vinyl plank | Microfiber pad | Mild, pH-neutral floor cleaner |
| Sealed tile and grout | Firmer scrubbing pad for grout lines | Tile cleaner suited to the surface |
Never use vinegar, bleach or strong alkaline cleaners on sealed wood, stone or waxed floors unless the flooring manufacturer specifically approves them. Dilute solutions exactly as the label directs. Too much cleaner leaves a film that attracts dirt and pet hair.
Step 3: Prepare the Room Before You Mop
Preparation saves more time than any other step. Pet hair, crumbs and grit act like sandpaper once they are wet, so remove them first.
- Pick up toys, bowls, cords and loose rugs.
- Dry-sweep or use a dry dust tool along baseboards and under furniture edges.
- Clear pet hair clumps from corners and the base of walls.
- Spot-treat any dried paw marks or accidents with an enzyme cleaner made for pet stains before you mop the whole area.
Step 4: Mop the Floor in Sections
Work in manageable sections, roughly the size you can cover before the pad starts to dry. A typical room is easiest done in strips, moving from the far corner toward the door so you do not walk over clean floor.
- Fill the reservoir or the bucket with the diluted solution, not plain tap water alone, unless the floor manufacturer approves water-only cleaning.
- Dampen the pad, then wring out excess liquid. The pad should feel damp, not dripping.
- Press the mop head gently onto the floor and guide it in slow overlapping passes.
- Let the spinning action do the scrubbing. Pushing hard does not improve results and can leave the surface uneven.
- Flip or rinse the pad when it looks visibly dirty, and switch to a clean one before you start a new section.
Tips for Heavy Pet Hair
If you have a long-haired dog or cat, sweep or vacuum first, then mop. Hair wrapped around the pad spindle will reduce spin efficiency and leave dull trails. Stop every few minutes to pull hair off the pad and the mop head.
Tips for Pet Accidents
Blot fresh urine with paper towels before mopping. Then clean the spot with an enzyme product, let it dwell as labeled, and mop the area. Mopping alone will not remove odor from the subfloor or grout, and repeated wet mopping over the same spot can spread residue.
Step 5: Dry the Floor and Check Your Results
Hard floors look streak-free when they dry quickly and evenly. Open a window or run a fan if the room is humid. Walk the room after it dries and look at it at a low angle, where streaks and dull spots show most clearly. If you see film or sticky patches, you likely used too much cleaner or did not rinse the pad often enough.
Step 6: Clean, Dry and Maintain the Mop
Maintenance keeps the mop working and prevents odors. After each session, remove the pad, rinse it under warm water until the water runs clear, and let it air-dry fully before storing it. Empty and rinse the reservoir, then leave the lid open so it dries. Wipe the mop head and check for hair wrapped around the spindle.
Store the charged mop somewhere dry and away from freezing temperatures. Charge the battery according to the manufacturer’s guidance, and replace the battery or the pads when performance clearly drops. For pad replacement options, see Spin Mop Replacement Parts: Which to Buy and How to Swap Them (2026).
Common Mistakes to Avoid
- Mopping before sweeping, which turns pet hair into a stuck-on film.
- Using too much cleaner, which leaves residue that attracts dirt.
- Soaking the floor. Standing water can damage wood, laminate and grout.
- Running the pad when it is visibly loaded with grime, which spreads dirt across the room.
- Storing the pad damp, which encourages odor and mildew.
- Ignoring the manufacturer’s floor-type guidance and using harsh chemicals on sealed surfaces.
Tips for Better Everyday Results
- Mop high-traffic areas, such as the kitchen and entryway, more often than rarely used rooms.
- Keep a second pad on hand so you always start with a clean one.
- Place a doormat at each entrance to cut down on tracked-in grit.
- Trim pet nails and wipe paws after walks in wet or salted weather to reduce floor marks.
Recommended gear
Pet owners often find that a few supporting tools make the Spinwave routine smoother. These are general-purpose options that pair well with a spin mop setup.
- Replacement microfiber mop pads keep you from reusing a loaded pad, which is the fastest route to streaks. View on Amazon
- Enzyme pet stain cleaner breaks down urine residue that ordinary floor cleaner cannot fully remove. View on Amazon
- Pet hair dry sweeper lifts hair and grit before you mop, which protects the pad and improves spin performance. View on Amazon
FAQ
Can I use the Spinwave cordless pet spin mop on hardwood floors?
Many owners use it on sealed hardwood, but you should follow the wood flooring manufacturer’s cleaning guidance. Use a damp pad, a floor cleaner approved for sealed wood, and wring the pad thoroughly to avoid standing moisture.
How often should I mop with a spin mop like this?
Homes with pets often benefit from quick mopping of high-traffic areas several times a week, with a more thorough clean once a week. Adjust based on how much hair, dirt and paw traffic your floors receive.
Why am I seeing streaks after mopping?
Streaks usually come from too much cleaner, a pad that is too wet or dirty, or a floor that did not dry evenly. Use less solution, rinse the pad more often, and open a window to speed drying.
Does it work on carpet?
No. Spin mops are designed for hard floors. For carpet and pet stains in carpet, a dedicated carpet cleaner is the right tool. See Bissell Carpet Cleaner for Pets: How to Choose and Use One Well for that category.
How do I stop pet hair from wrapping around the spindle?
Sweep or vacuum before mopping, and pull hair off the pad and mop head during the session. Trimming longer hair in the area can also help.
How do I know when to replace the pad?
Replace the pad when it no longer holds moisture well, feels stiff or matted, or leaves residue after rinsing. Worn pads cannot lift grime effectively.
Is it safe to use cleaning solution around pets?
Choose pet-safe, low-residue cleaners, rinse as directed and keep pets off the floor until it is completely dry. If your pet has skin sensitivities or ingests cleaning products, consult your veterinarian.
Can I use it on tile and grout?
Yes, on sealed tile. Use a firmer pad for grout lines and a tile-appropriate cleaner. Avoid soaking grout, which can stain or weaken it over time.
Conclusion
The Bissell Spinwave cordless pet spin mop works best when you match the pad and solution to your floor, sweep before you mop, and keep the pad clean during each session. Consistent, moderate use will keep hard floors looking fresh even with shedding pets. Dry, clean and store the mop properly after each use to protect performance and prevent odor.
Related reading
- Bissell Spinwave Hard Floor Spin Mop: How to Use It for Streak-Free Floors
- Spin Mop vs Steam Mop (2026): Which Is Better for Your Floors?
- Spin Mop vs Flat Mop (2026): Which Is Better for Your Floors?
Ready to choose one?
About Graham Fisher
Graham Fisher is part of our editorial team and reviews and edits our non-vacuum cleaning gear guides, checking product details against manufacturer specifications and owner feedback.






Write Your Review
No reviews yet. Be the first to share your experience!